
What is a Dome Switch Keypad?
Shanyo Tactile Dome Design Guide designs metal domes in membrane switches. metal dome array tactile keypad uses two circuit board traces for use with the metal dome. Metal domes, usually made of stainless steel, are momentary switch contacts that provide a tactile feel or “click” when pressed. When the circuit is activated, the metal dome becomes a tactile metal dome switch.
The main advantage of tactile dome switch keyboards is the tactile click or feedback when activated. When a key is pressed, the user realizes that they have actually acted or successfully pressed the switch due to the sensory and audible feedback received from the dome.
Another major advantage of use tactile dome switches is their long life and reliability. Standard dome switch keypads are now rated from 1 million to 5 million cycles. They remain the most reliable switch type in the membrane switch space.
How to Place a Metal Dome Array on a Circuit Board?
There are many ways you can place a metal dome on a membrane switch, flex circuit, or circuit board. The metal dome can be placed in a pocket or attached to tape. The most common method of securing a metal dome to a substrate is with pressure-sensitive tape (PSA). Metal dome arrays backed by PSA tape are also known as Peel & Place arrays. Place pressure sensitive tape over the dome and attach it to the carrier. The dome is then peeled off the carrier (also called the release liner) and placed onto the circuit board.
Using a peel-and-place array to adhere domes to circuit boards is more cost-effective, accurate, and faster than any manual placement technique. There are many things your design should consider before attaching a metal dome array to a circuit board.
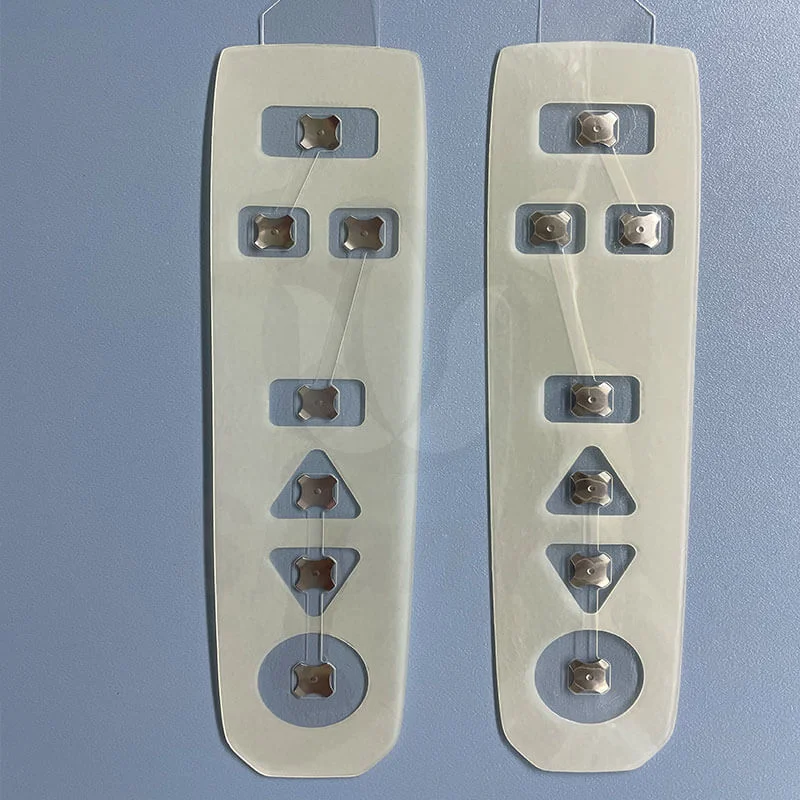
Design metal dome array
Before placing the dome on the board, it is critical to understand the structure of the dome array. The metal dome array features a multi-layer tape construction that provides a sealed environment while still allowing dome ventilation when compressed. There are usually two distinct layers – the top layer and the ventilation layer. If you choose to use only a single layer of tape, you will have to add vents to the board design. The top layer has the same construction as a single layer of tape.
Ventilation is an important component of dome array and circuit design. Ventilation allows trapped air to escape, ensuring the dome operates properly. Otherwise, the metal dome will not press or appear abnormal. The ventilation layer has a variety of material thicknesses to choose from, which are equal to or less than half the height of the metal-free dome. Dig a vent track (also called a channel) from the metal dome to the metal dome. The width of these tracks is usually 0.100 inches. To maintain an air seal, the perimeter of the array is cut into a “cross” or “X,” requiring at least 0.120 inches of material. The two layers are attached using a mechanical laminator with two press wheels. Once the two layers are laminated, the dome is loaded into the cavity.
You must leave enough space between the metal domes to ensure proper bonding. Placing metal domes too close together can result in poor adhesion and excessive “bubbles” in the bonding material. Proper spacing depends on the metal dome size, shape, height, and proximity of the metal dome to other objects. The distance between metal dome locations and from the metal dome location to the end of the circuit board or flex circuit should be at least 3mm. Your design should always include metal dome location, metal dome orientation, desired outer perimeter ( the edge of the board), and any internal cut features.
How to Protect Dome Arrays?
Three ways to mount a metal dome array to a circuit board:
1. Manual placement by assembler using visual alignment
2. Manual placement by assembly personnel using application fixtures
Manual placement using application fixtures is faster, more accurate, and more cost-effective than visual alignment.
3. Use automated equipment for automatic placement
Depending on your setup, the most cost-effective way to install a metal dome array is with automated placement equipment.
Shanyo engineers developed a fully automatic assembly machine successfully developed it and established a metal dome array department. The metal domes were independently developed, and stamped, and have multiple patents. The fully automatic assembly machine equipment adheres the metal dome to the circuit board better than any other Manual placement techniques are more cost-effective, more accurate, and faster.
1. In mass production scenarios, automated equipment can complete work quickly and efficiently, improve production efficiency, and make output more stable;
2. When products require high precision, automation equipment can better control precision and product parameters to achieve higher quality and higher precision products;
3. Automated equipment can work 24 hours a day, reducing the number of manual interventions and production costs, and can bring higher benefits.
4. Compared with manual mode, automatic mode is more convenient to operate, can reduce human errors, and greatly improve operating efficiency;
5. Automation equipment can automatically detect and repair faults during work, reducing downtime.
The disadvantage of the automatic mode is that compared with the manual mode, the equipment in the automatic mode costs more in maintenance, maintenance, replacement of parts, etc., and the operation requirements for the relevant personnel are also more professional.
Please consult for details.
Metal dome array fixed to circuit board
Whether you are using application fixtures or automated equipment, when securing a metal dome with pressure-sensitive tape, it is critical to move air out of the vented area so the dome does not “float.” Float occurs when the air around the metal dome causes the metal dome to stick to the top of the tape and prevent it from holding securely to the circuit pads. To prevent this from happening, place a metal dome with pressure-sensitive tape directly on the circuit board. Make sure the adhesive around the edge of the metal dome is secured to the circuit board, then move outward to the edge of the adhesive. If the adhesive around the dome is too tight, it may cause the dome to collapse. This condition is also called preloading.
Custom application fixtures ensure fast and accurate placement of the dome array onto the application surface. Isolation springs and positioning pins allow your assembly team to easily press the board onto the dome array. For complex circuit board designs, the fixture can use existing holes on the circuit board. Applying a fixture improves placement accuracy and helps prevent any assembly errors.
The metal dome array is secured to the circuit board with a custom placement fixture
The complexity of the design, project size, and labor costs will influence whether you choose to place the dome array by manual installation, using application clamps, or automated placement equipment. Contact Shanyo today to start your metal dome array design.