
You probably pressed one five minutes ago. Maybe it was on your microwave, your car key fob, or the volume button on your headphones. We live in a world of buttons, but we rarely stop to think about what is actually happening underneath that plastic surface.
At the heart of many of these interfaces is a simple, elegant component called the snap dome switch. It isn’t a complex machine with gears and levers. It’s basically a bubble of metal. But don’t let the simplicity fool you. This little piece of curved steel is a marvel of engineering that solves two problems at once: it completes an electrical circuit, and it tells your finger, “Okay, job done.”
Understanding the Mechanics of a Snap Dome Switch
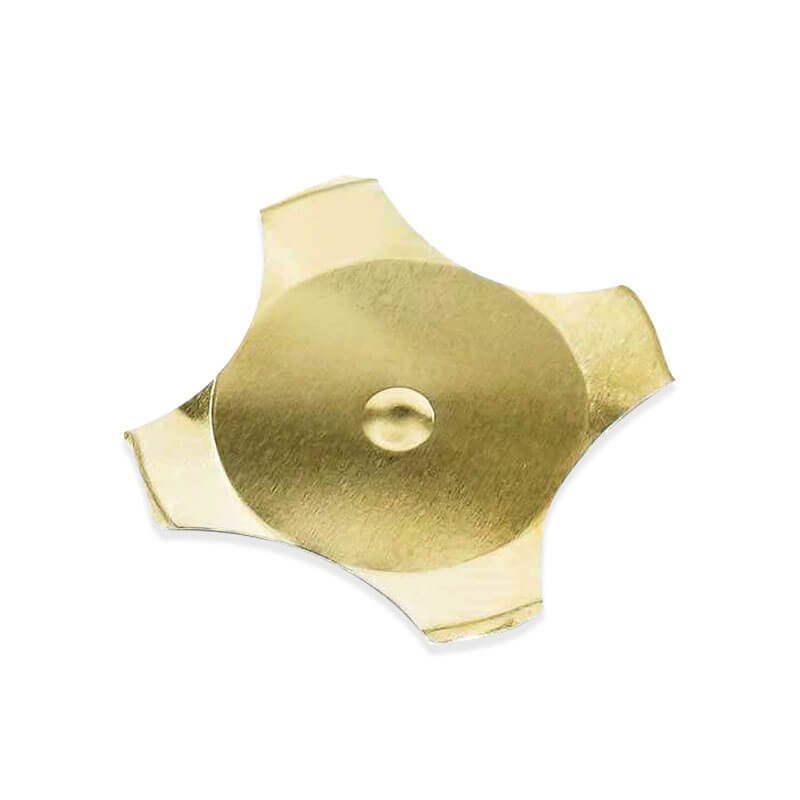
So, how does it actually work? Imagine a tiny, circular trampoline made of thin stainless steel. It’s curved upwards. This is its resting state.
When you press down on the center of the dome, you are building up potential energy. The metal resists you—that’s the “force” you feel. At a certain point, the geometry gives up. The center of the dome collapses and inverts, snapping downward to touch the circuit board below.
This is where the magic happens. The snap dome switch acts as a bridge. On the circuit board (PCB) underneath, there are two separate electrical traces—usually an outer ring and a center pad. The metal dome sits on the outer ring. When the center snaps down, it hits the center pad, connecting the two. Zap. Circuit closed. Signal sent.
When you lift your finger, the spring memory of the steel kicks in, and the dome pops back up to its original shape, breaking the circuit.
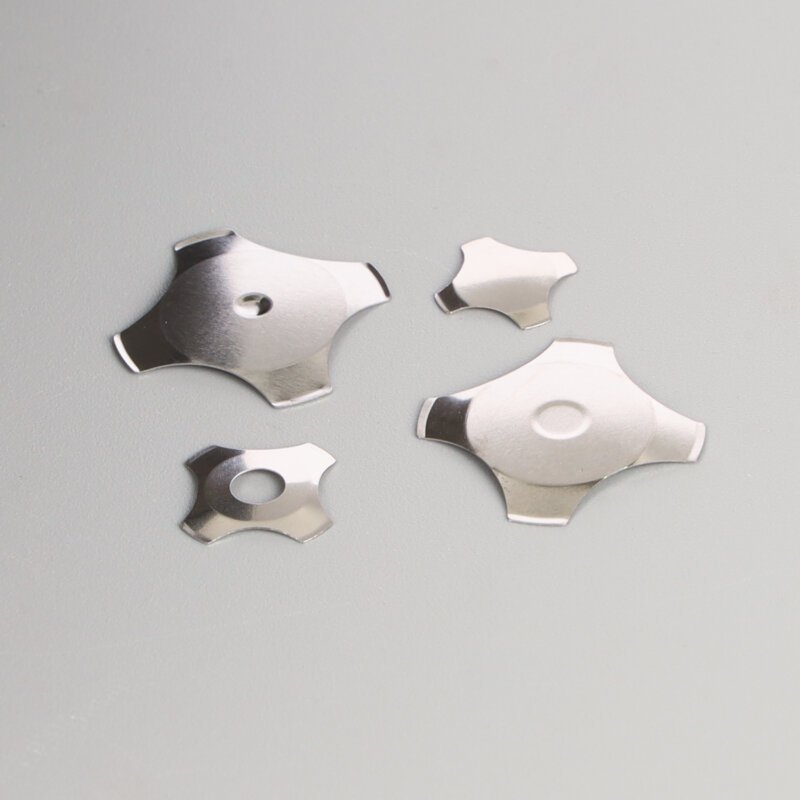
The Anatomy of a Snap Dome Switch Assembly
It’s rarely just the dome sitting there naked on a board. It’s usually part of a “sandwich” of layers. If you took apart a membrane keypad, here is what you would find:
- The Overlay: The graphic layer on top with the icons and colors.
- The Actuator: Sometimes there’s a tiny nub on the bottom of the overlay to hit the dead center of the dome.
- The Retainer: A layer of tape or adhesive that holds the dome in place so it doesn’t slide around.
- The Dome: The star of the show.
- The PCB: The green board with the copper/gold pads.
It’s a system. If the adhesive is too tight, the snap dome switch can’t breathe (air needs to move for it to snap), and the button feels “stiff.” If the adhesive is too loose, the dome slides off the pad and the button stops working. It’s a delicate balance.
Why the "Snap" Matters: Tactile Feedback
Engineers talk a lot about “haptics.” That’s just a fancy word for “how it feels.” The main reason designers might choose a stable four leg snap dome switch over other types (like those mushy rubber buttons on old TV remotes) is the click. That sharp, crisp snap is feedback.
It tells your brain that the action was successful without you needing to look at a screen. Think about driving a car. You want to turn on the defrost. You don’t want to take your eyes off the road to look at an LCD screen. You reach out, feel the button, and press until you feel the click. That click gives you confidence. A bad switch feels “mushy”—you press it and wonder, “Did that work? Should I press it harder?” That uncertainty is exactly what a good four legs snap dome switch eliminates.
Materials and Plating Options for a Snap Dome Switch
Not all domes are created equal. Depending on where the switch is going to live (a cozy living room vs. a rainy construction site), the materials change.
The base material is almost always Stainless Steel (specifically SUS 301 or 304). It has excellent spring memory. But the surface treatment—the plating—makes a huge difference in reliability.
| Material / Plating | Best Use Case | Pros | Cons |
|---|---|---|---|
| Bare Stainless Steel | Toys, cheap remotes | Low Cost | Can oxidize over time; higher resistance. |
| Nickel Plated | Consumer electronics | Good corrosion resistance | Slightly more expensive than bare steel. |
| Gold Plated | Medical, Industrial, Auto | Excellent conductivity; never rusts | Most expensive option. |
Advantages of Using a Snap Dome Switch
Why is this technology so popular? Why hasn’t it been replaced by touchscreens entirely?
- Profile: They are incredibly thin. We are talking less than 1mm. In the race to make phones and gadgets thinner, the snap dome switch is a hero because it takes up almost no vertical space.
- Cost: Once you pay for the tooling (the mold), stamping out metal domes is very cheap.
- Durability: A well-made dome can withstand 1 million to 5 million cycles. That is a lot of clicks.
- Sealing: Because they are flat, they are easy to cover with a sealed overlay, making the device waterproof and dustproof.
Resource
If you want to dig a little deeper into the science of switches and materials, check out these links:
- Switch (Electronics) – Wikipedia: A broad overview of different switch types, placing the metal dome in context.
- Stainless Steel Grades: Understanding the difference between 301 and 304 steel, which dictates how
FAQ
Can I solder a snap dome switch to a circuit board?
Generally, no. Most metal domes are held in place by a “peel-and-stick” adhesive layer, not solder. The heat of soldering can warp the thin metal, ruining the “snap.” However, there are specific “SMD” (Surface Mount Device) domes that come in a plastic housing that can be soldered, but the dome itself is usually mechanically held, not soldered directly.
Why does my button sound like it's clicking twice?
This is a dreaded defect called the “double click.” It usually happens if the snap dome switch is too large for the actuator, or if it has been damaged during assembly. It snaps down, bounces up slightly, and snaps again. It feels terrible and sends confuse signals to the device.
Are these switches waterproof?
The metal dome itself is just metal—it doesn’t care if it gets wet. However, the circuit underneath it definitely cares. The switch assembly becomes waterproof only when the overlay and adhesive layers create a hermetic seal around the dome, trapping it in a dry air pocket.