
The Simple Genius Behind How Membrane Buttons Work
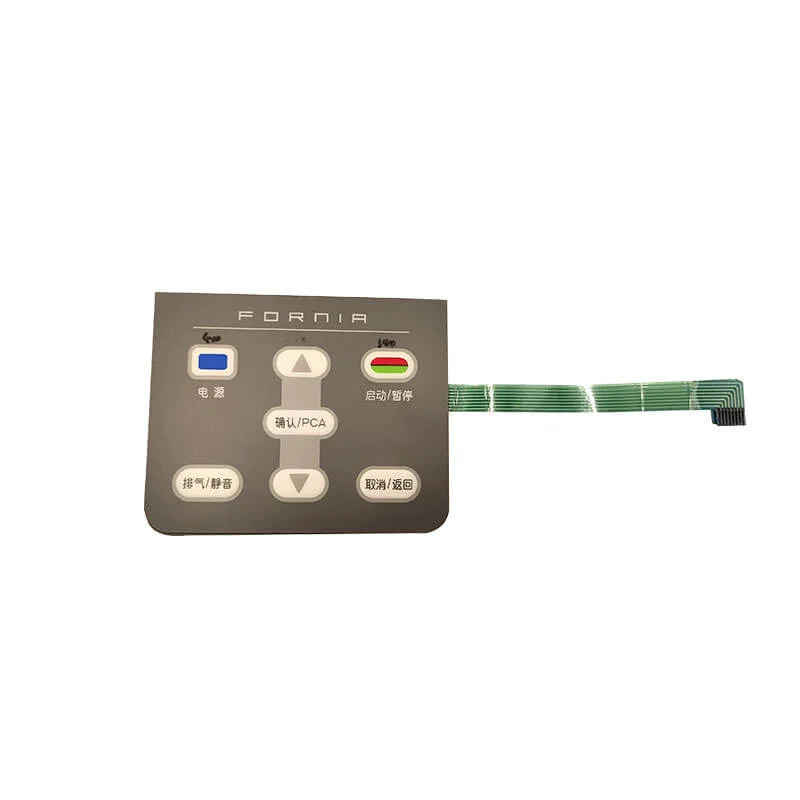
Press a button on a microwave. Type a code into a security panel. Adjust settings on gym equipment. These everyday actions involve membrane buttons more often than most people realize. The technology sits quietly behind countless interfaces, doing its job without drawing attention to itself.
But what’s actually happening when that button gets pressed? The mechanics are surprisingly elegant—thin layers working together through basic electrical principles. No complicated moving parts, no springs or hinges. Just pressure, contact, and circuit completion. Understanding how membrane buttons work reveals why manufacturers across so many industries continue choosing this technology over alternatives.
Breaking Down the Layered Structure of Membrane Buttons
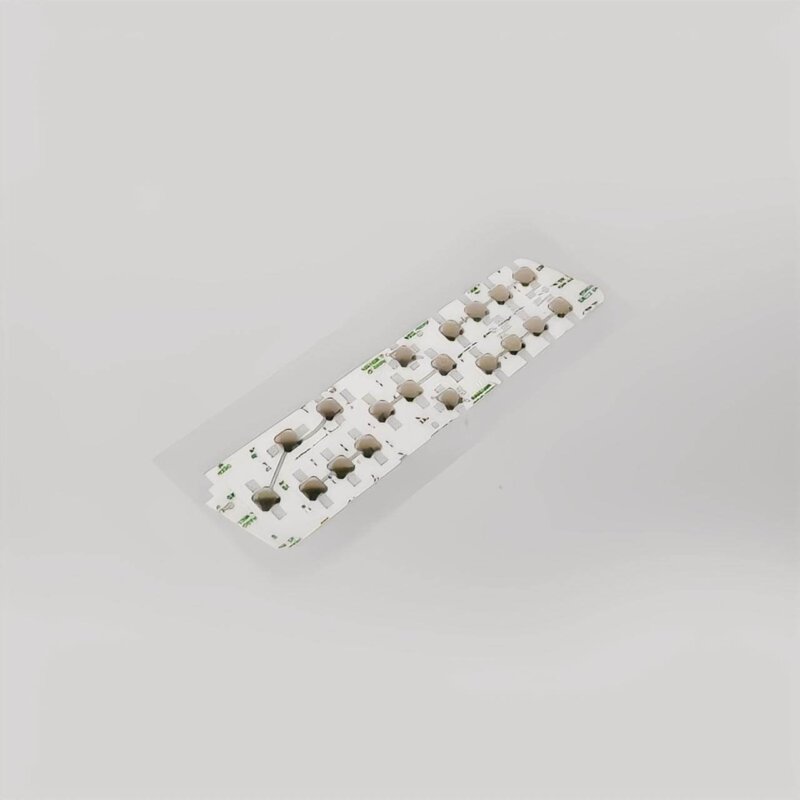
Everything starts with construction. A membrane button isn’t a single piece of material but rather several thin layers bonded together into one functional unit.
The Essential Layers
From top to bottom, here’s what makes up a typical assembly:
- Graphic overlay – What users see and touch, usually printed with icons or text
- Top circuit layer – Flexible film with conductive pathways printed on its underside
- Spacer layer – Thin material with openings beneath each button position
- Bottom circuit layer – Another conductive film completing the electrical path
- Adhesive backing – Secures everything to the device housing
Each layer serves a purpose. Remove any one of them and the whole system fails. The thickness of these individual sheets usually measures just fractions of a millimeter, which explains why membrane buttons can fit into such compact spaces.
Why the Spacer Matters So Much
That spacer layer—easy to overlook, honestly—makes the entire mechanism possible. It maintains separation between the two circuit layers during rest. Without it, the circuits would touch constantly, creating a permanent signal rather than a responsive switch.
The spacer contains precisely positioned holes or cutouts. These openings align directly beneath each button location on the overlay. When pressure comes down on a specific spot, the top circuit can flex through that opening to reach the bottom circuit below.
The Moment a Membrane Button Gets Pressed
So what happens in that instant of contact? The sequence unfolds quickly—milliseconds from press to signal.
Applying pressure to the graphic overlay deforms the flexible material beneath it. The top circuit layer, being thin and pliable, bends downward into the spacer opening. It continues until contacting the bottom circuit layer.
| Phase | Physical Action | Electrical Result |
|---|---|---|
| Rest state | Layers separated by spacer | Open circuit, no signal |
| Pressure applied | Top layer flexes toward bottom | Approaching contact |
| Contact made | Conductive traces touch | Closed circuit, signal sent |
| Pressure released | Material returns to position | Circuit breaks again |
The conductive traces on each circuit layer are carefully designed to align at button locations. When they touch, electricity flows between them, completing a circuit that the connected device interprets as an input command.
How Membrane Buttons Transmit Signals to Devices
Making contact is only half the story. That electrical connection needs to communicate with the main device somehow.
The Tail Connector
Most membrane button assemblies include a flexible tail or ribbon extending from one edge. This tail contains conductive traces that connect to the button circuits. It terminates in a connector that plugs into the device’s main circuit board.
When a membrane button closes its circuit, the signal travels through these traces in the tail, reaching the device’s processor or controller. The device then responds appropriately—starting the microwave, accepting the security code, adjusting the equipment settings.
Matrix Configurations
Devices with multiple membrane buttons often use matrix wiring to reduce the number of required connections:
- Rows and columns of traces create a grid pattern
- Each button sits at a unique intersection point
- Pressing a button connects one row trace to one column trace
- The controller identifies which intersection closed
This approach allows dozens of buttons to operate through relatively few connector pins. Efficient design, really.
Factors That Affect How Membrane Buttons Feel and Respond
Not all membrane buttons feel identical. Some offer distinct feedback while others feel mushy or vague. Several design variables influence this experience.
Tactile Enhancement Options
Basic flat membrane buttons provide minimal physical feedback. Users might not feel certain the press registered. To address this, manufacturers often incorporate additional elements:
- Embossed overlays that create raised button areas
- Metal dome switches beneath key positions for a click sensation
- Poly domes made from flexible plastic for softer feedback
- Varied spacer thicknesses affecting required pressure
These enhancements add cost and complexity but significantly improve the user experience for applications requiring confident input confirmation.
| Enhancement Type | Feedback Strength | Cost Impact | Typical Applications |
|---|---|---|---|
| Flat membrane | Very light | Lowest | Sealed panels, simple controls |
| Embossed overlay | Light | Low | Appliances, basic interfaces |
| Poly dome | Moderate | Medium | Consumer electronics |
| Metal dome | Strong click | Higher | Industrial controls, keypads |
Why Membrane Buttons Remain Popular Across Industries
Understanding how flexible membrane switch buttons work explains their continued prevalence. The design offers practical advantages that mechanical alternatives struggle to match in certain contexts.
The sealed surface construction of a flexible membrane switch prevents contamination. Dust, moisture, cleaning chemicals—none of these easily penetrate a properly designed membrane button assembly. Medical facilities appreciate this. Food service operations too. Anywhere cleanliness matters, basically.
Manufacturing costs stay reasonable, especially at volume. The printing processes used to create circuit traces for flexible membrane switch designs scale efficiently. Custom graphics and layouts don’t require expensive tooling changes.
And the low profile fits applications where space constraints exist. Slim devices, curved surfaces, limited panel depth—flexible membrane switch solutions accommodate all of these.
Limitations Worth Acknowledging
No technology suits every purpose perfectly. Membrane buttons have drawbacks that matter in certain applications.
The tactile feedback, even with enhancements, rarely matches mechanical switches. Users who need absolute confirmation of each press—data entry specialists, for instance—might find this frustrating. Durability varies significantly by quality level. Cheaper assemblies wear out faster than premium versions.
Extreme temperatures can affect performance too. The flexible materials behave differently when very cold or hot, potentially changing the feel or responsiveness. If you want to know more about membrane button, please read What Is A Membrane Button.
FAQ
How long do membrane buttons typically last before wearing out?
Lifespan depends heavily on construction quality and usage intensity. Budget membrane buttons might handle 100,000 to 500,000 actuations. Higher-quality versions routinely reach 1 million presses, with premium industrial designs exceeding 5 million cycles under proper conditions.
Can membrane buttons work reliably in wet environments?
Yes, when designed appropriately. The inherently sealed construction resists moisture infiltration better than most mechanical switches. Outdoor equipment, kitchen appliances, and marine applications commonly use membrane buttons specifically for this water-resistant capability.
Why do some membrane buttons click while others don't?
The presence or absence of tactile feedback elements determines this. Buttons incorporating metal domes or similar mechanisms beneath the overlay produce audible clicks. Basic flat membrane designs without these additions operate silently with minimal physical feedback.