حقيقة إصلاح مفتاح الغشاء الغشائي
تتوقف المعدات عن الاستجابة للضغط على الأزرار. إحباط مألوف. قبل طلب قطع الغيار باهظة الثمن، يتساءل الكثير من الناس - هل يمكن أن يؤدي ذلك إلى مفتاح غشاء أن يتم إصلاحه بالفعل؟
الإجابة ليست واضحة. أحياناً نعم، وأحياناً لا. يعتمد الأمر كليًا على الخطأ وكيفية بناء المفتاح. تبدو هذه الواجهات الرقيقة والمرنة بسيطة من الخارج. أما من الداخل، فهي تجميعات معقدة بشكل مدهش مع طبقات متعددة تعمل معاً.
يساعد فهم ما يمكن إصلاحه بشكل واقعي على تجنب إهدار الجهد المهدر ويوفر معلومات أفضل حول الإصلاح مقابل الاستبدال.
فهم كيفية عمل المفتاح الغشائي
هيكلية الطبقة الأساسية
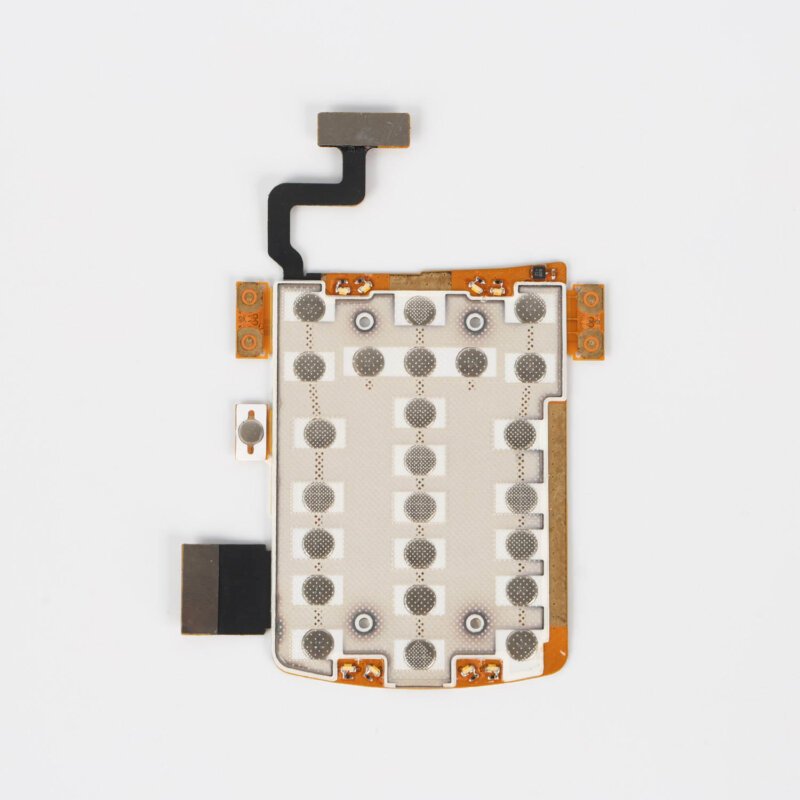
يتكون المفتاح الغشائي النموذجي من عدة طبقات مترابطة:
- تراكب رسومي - السطح المطبوع المرئي
- طبقة لاصقة
- طبقة دارة علوية ذات آثار موصلة
- طبقة مباعدة بفتحات في مواضع التبديل
- طبقة الدائرة السفلية
- مادة لاصقة خلفية للتركيب
عندما يضغط شخص ما على زر، تنحرف الدائرة العلوية عبر فتحة الفاصل وتلامس الدائرة السفلية. وهذا يكمل مساراً كهربائياً. عند تحرير الضغط، تنفصل الطبقات - مما يؤدي إلى انفصال الدائرة.
مبدأ بسيط. لكن البناء متعدد الطبقات يخلق تحديات في الإصلاح.
أنماط الفشل الشائعة
تتطلب المشاكل المختلفة أساليب مختلفة:
- تراكب رسومي مهترئ أو تالف
- آثار موصلة مكسورة
- مادة لاصقة فاشلة تسمح بانفصال الطبقة
- التلوث بين طبقات الدائرة
- موصل الذيل التالف
- البقع الميتة من الاستخدام الكثيف المتكرر
تستجيب بعض هذه المشكلات لمحاولات الإصلاح. ويتطلب بعضها الآخر بشكل أساسي الاستبدال.
مشاكل التبديل الغشائي التي يمكن إصلاحها المحتملة
تلف الموصل والذيل
غالباً ما يفشل الذيل المرن الذي يربط المفتاح الغشائي بلوحة الدارة الرئيسية أولاً. يتسبب الثني المتكرر أو الإدخال غير السليم أو التلف المادي في حدوث انقطاعات في الآثار الموصلة.
تشمل خيارات الإصلاح ما يلي:
- أقلام الحبر الموصلة لسد الفواصل الصغيرة
- إيبوكسي موصل للإصلاحات الكبيرة
- لحام أسلاك التوصيل الدقيقة بعناية (صعب ولكنه ممكن)
- ذيول بديلة إذا كانت متوفرة بشكل منفصل
تختلف معدلات النجاح. تستجيب الفواصل النظيفة في المواقع التي يمكن الوصول إليها بشكل أفضل من التلف داخل الموصلات المجعدة.
تلوث السطح
في بعض الأحيان تتعطل المفاتيح بسبب وصول التلوث - انسكاب السوائل أو الغبار أو الحطام - بين طبقات الدائرة. يمكن للتنظيف استعادة الوظيفة، على الرغم من أن الوصول إلى الداخل دون التسبب في مزيد من الضرر يتطلب عناية.
يعمل كحول الأيزوبروبيل والصبر في بعض الأحيان على تحقيق المعجزات. يساعد الهواء المضغوط على إزالة الجسيمات. التفكيك الكامل يخاطر بتدمير المفتاح بالكامل، لذا فإن الحذر مهم هنا.
الأعطال الطفيفة في المواد اللاصقة
عندما تبدأ الطبقات بالانفصال عند الحواف، يمكن أن تؤدي إعادة الالتصاق بعناية باستخدام مواد لاصقة مناسبة حساسة للضغط إلى إطالة عمر الخدمة. وهذا يعمل بشكل أفضل لرفع الحواف التجميلية أكثر من الفصل في مواضع التبديل النشطة.
تلف مفتاح الغشاء الذي يتطلب عادةً استبداله
| نوع الضرر | قابلية الإصلاح | السبب |
|---|---|---|
| آثار متعددة مكسورة | منخفضة جداً | الكثير من نقاط الفشل |
| طبقة الدائرة المهترئة | غير قابل للإصلاح | يتم إتلاف المواد |
| تلوث واسع النطاق | عادة لا | قد يؤدي التنظيف إلى مزيد من الضرر |
| المناطق النشطة المصفحة | نادراً ما تنجح | تعرض حساسية الضغط للخطر |
| تراكب رسومي مهترئ بشدة | مستحضرات التجميل فقط | لا يستعيد الوظيفة |
| التآكل الداخلي | غير عملي | الضرر واسع الانتشار للغاية |
عندما تصبح الآثار متقطعة
يمكن أن تنكسر الآثار الموصلة - وهي عادةً حبر فضي مطبوع على غشاء بوليستر - بسبب إجهاد الثني أو الخدوش أو التآكل. يمكن سد الفواصل الفردية في المواقع التي يمكن الوصول إليها. فواصل متعددة في جميع أنحاء الدائرة؟ هذا غير قابل للإصلاح فعلياً.
الآثار رقيقة. رقيقة جداً. وهي محصورة بين طبقات. يتطلب الوصول إليها دون تدمير المواد المحيطة بها مهارة ومعدات أكثر مما تبرره معظم محاولات الإصلاح.
تدهور المواد الأساسية
تتقدم مفاتيح الغشاء في العمر. يصبح البوليستر هشاً بمرور الوقت. تفقد المواد اللاصقة تماسكها. تتأكسد الأحبار الموصلة. يؤدي التعرض البيئي إلى تسريع هذه العمليات.
عندما ينتشر التدهور على نطاق واسع، فإن إصلاح مشكلة واحدة يكشف عن المشكلة التالية. في مرحلة ما، يكون المفتاح قد وصل ببساطة إلى نهاية عمره الافتراضي.
طرق الإصلاح الذاتي لمفتاح غشاء التبديل الغشائي
خطوات التشخيص أولاً
قبل محاولة الإصلاحات، حدد المشكلة الفعلية:
- تحقق من الاستمرارية من خلال موصل الذيل
- اختبر مواضع المفاتيح الفردية باستخدام مقياس متعدد
- ابحث عن التلف المرئي تحت إضاءة جيدة
- تحقق من عدم وجود تلوث أو رطوبة
- تقييم الحالة العامة للمواد
إن معرفة الخطأ بالضبط يمنع إهدار الجهد في الإصلاح الخاطئ.
الأدوات والمواد
تشمل المستلزمات المفيدة لإصلاح مفاتيح الغشاء ما يلي:
- مقياس متعدد مع وظيفة الاستمرارية
- قلم حبر موصل أو طلاء موصل
- كحول الأيزوبروبيل (90% أو أعلى)
- مناديل مبللة خالية من الوبر
- التكبير (عدسة مكبرة أو مجهر)
- ملاقط دقيقة الطرف الرفيع
- مواد لاصقة بديلة مناسبة
أثبتت أقلام الحبر الموصلة - النوع المستخدم لإصلاح ثنائي الفينيل متعدد الكلور - أنها مفيدة بشكل خاص لإصلاحات الأثر. وهي ليست رخيصة، ولكن معدات الاستبدال ليست رخيصة أيضاً.
تابع بحذر
لا تتحمل مفاتيح التبديل الغشائية التعامل الخشن. فالمواد رقيقة وهشة نسبياً. ويؤدي التنظيف العنيف أو الحرارة المفرطة أو إعادة التجميع بإهمال إلى مشاكل جديدة أسرع من حل المشاكل القديمة.
الصبر مهم أكثر من أي شيء آخر. التسرع يضمن الفشل تقريباً. إذا كنت تريد معرفة المزيد عن التبديل الغشائي، يرجى قراءة ما هو المفتاح الغشائي.
الأسئلة الشائعة
كم من الوقت يجب أن يدوم مفتاح الغشاء قبل أن يحتاج إلى إصلاح؟
عادةً ما تتحمل مفاتيح التبديل الغشائية عالية الجودة من مليون إلى خمسة ملايين عملية تشغيل لكل موضع - وأحيانًا أكثر من ذلك للتصميمات المتميزة. يعتمد عمر التقويم بشكل كبير على الظروف البيئية وأنماط الاستخدام. تدوم المفاتيح في البيئات النظيفة التي يتم التحكم في مناخها لفترة أطول من تلك التي تتعرض لدرجات الحرارة القصوى أو الرطوبة أو التلوث. وتعتبر مدة الخدمة من خمس إلى عشر سنوات معقولة بالنسبة للمفاتيح جيدة الصنع في التطبيقات المناسبة.
هل يمكن إنقاذ المفاتيح الغشائية التالفة بسبب المياه؟
في بعض الأحيان. التصرف السريع مهم للغاية. يوفر فصل الطاقة على الفور وتجفيف المفتاح تمامًا قبل حدوث التآكل أفضل فرصة. يسبب الماء النقي ضررًا أقل من الماء الملوث أو السوائل السكرية. إذا لم يتطور التآكل على الآثار الموصلة، فإن التنظيف باستخدام كحول الأيزوبروبيل والتجفيف الكامل قد يعيد الوظيفة. بمجرد ظهور التآكل، يصبح الإصلاح أكثر صعوبة.
هل يستحق إصلاح المفتاح الغشائي القديم أم استبداله فقط؟
ويعتمد ذلك على عدة عوامل - توافر البدائل، وقيمة المعدات، وتعقيد الإصلاح، وضيق الوقت. فبالنسبة للمعدات الشائعة ذات المفاتيح البديلة المتاحة بسهولة، عادة ما يكون الاستبدال أكثر منطقية من الناحية الاقتصادية. بالنسبة للمعدات المتقادمة أو الأجهزة العتيقة أو أجهزة التحكم المتخصصة للغاية حيث لا يوجد بديل، تصبح محاولات الإصلاح جديرة بالاهتمام على الرغم من انخفاض احتمالية النجاح. يتغير الحساب حسب كل حالة على حدة.